Use this extension if you don't want to use hardcoded menus/items only in your application. Let the admin/sitemaster design the menus online.
The menubuilder module comes with (hope so) all necessary features to manage your menus and items. The extension supports all menus inherited from CMenu.
Features 
A single adminform to manage menus and menuitems
- CRUD operations
- Assign the items to a menu
- Arrange the items, nestable for submenu items
- Preview the menu as mbmenu, superfish, bootstrap-navbar,bootstrap-menu, dropdownlist and lists
- Simulate scenarios, userroles and languages on preview
- Fine granular access-permissions (adminroles): Who is allowed (user/role) to update/append/delete menus and menuitems
- 2 themes: blueprint/bootstrap
Menus and items
- visibility by userroles (rbac)
- visibility by different scenarios, for example 'backend', 'frontend', 'dashboard' ...
- support for icons
- support for ajax
- generate CMenu items, dropdownlists, (un-)ordered lists
- Fine granular admin-permissions(adminroles): Who is allowed (user/role) to update/append/delete menus and menuitems
- Support for all properties of the CMenu items
- Merge different menus into one
- Multilanguage support
- Storage: file, mysql, mongodb
- Export/import to transfer menus/items from one site to another
- Caching menu items
- Themes for bluegrid and bootstrap
- Callbacks onVisible, onActive, onUrl, onLabel when rendering a menuitem
- Customize the adminform view and all components
Requirements 
Developed with Yii 1.1.12
- Optional YiiBooster for bootstrap theme
- Optional MongoYii for mongodb support
Installation 
The menubuilder is designed as an extension that holds the core components and a module as 'working copy' for you, where you can customize the components and views.
You can download the code from menubuilder on github too.
- Extract the menubuilder.zip to protected/extensions
Copy the directory protected/extensions/menubuilder/modules/menubuilder to your modules directory (protected/modules)
This is your working copy, where you can modify the code without touching the core components.
Ensure, the directory protected/modules/menubuilder/data is writeable.
- Add the menubuilder module to the modules in config/main.php
'modules'=>array(
  'menubuilder',
  ...
)
Browse to the menubuilder module (yourapp/index.php/menubuilder) and you should be able to play around with the menubuilder for testing.
On the first run the menus from data/installmenus.php and data/installmenuitems.php will be installed. You can modify these arrays and call 'reinstall' from the utilities tab in the menubuilder form. Set 'checkInstall'=>false after the first run (see below).
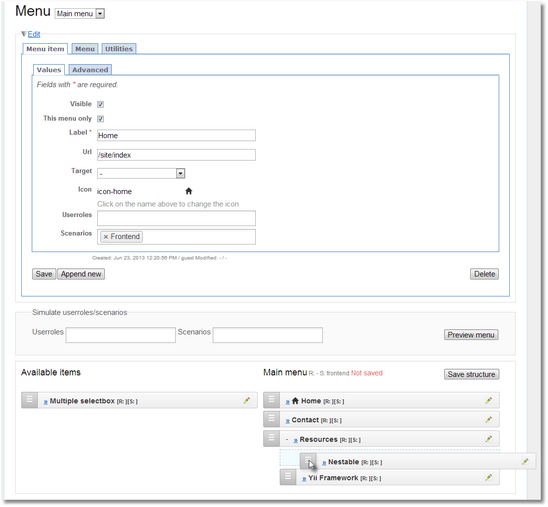
How it works 
The implementation is built upon the Nestable jQuery Pluging by David Bushell. The nestable items are serialized to a JSON string like: [{"id":13},{"id":14},{"id":15,"children":[{"id":16},{"id":17},{"id":18}]}]
So there is a (unordered) list of menu available items at the left side of the manage form. The menu model holds this JSON string as the 'nestedConfig' property with the structure of the items at the right side. You build the hierachical list by drag & drop the items between the two sides.
The default configuration shows the menupreview as a superfish menu and as a unordered list with the 'blueprint' theme, no multilanguage support. Support for the userroles 'Guest' and 'Autenticated' and two scenarios: 'Backend' and 'Frontend'
Usage 
Extended configuration 
'modules'=>array(

'menubuilder'=>array(
            'theme'=>'bootstrap', //comment for bluegrid theme (=default)
            //'checkInstall'=>false, //uncomment after first usage
            //'cacheDuration'=> -1, //uncomment for disabling the menucaching
            'languages'=>array('de','en_us'),
            'supportedScenarios'=>array('backend' => 'Backend', 'frontend' => 'Frontend', 'dashboard' => 'Dashboard'),

            //set EMBDbAdapter to switch to mysql (checkInstall=>true on first run)
            //'dataAdapterClass'=> 'EMBDbAdapter', //'EMBMongoDbAdapter',

            //the available menus/lists for the preview
            'previewMenus'=>array(
               // 'superfish'=>'Superfish',
               // 'mbmenu'=>'MbMenu',
                'bootstrapnavbar'=>'Bootstrap Navbar',
                'bootstrapmenu'=>'Bootstrap Menu',
              // 'dropdownlist'=>'Dropdownlist',
                'unorderedlist'=>'Unordered list'
            )
        ),
)
Permission settings 
- When using in your application you have to set the accessRules in the AdminController to check the access to the actions of the menubuilder (index, saveAsDefault, restoreDefault, reinstall, export, import, flushCache) for (admin/sitemaster) users. See: protected/modules/menubuilder/controllers/Admincontroller
- The menubuilder is designed to delegate managing menus to a sitemaster or other users. By default every user can configure the menus with all features. So you have to configure the permissions of the admin form. This is done by the method formPermissionRules() of the Admincontroller. This is implemented analogous to the accessRules, but 'actions' are replaced by following items:
public function formPermissionRules()
    {
        return array(
            array('allow', // The same as accessRules
                'users' => array('*'),
                //'roles'=>array('admin'),
                //'ips' .....


                //instead of actions:
                'menu'=>array('create','update','delete','simulate','preview'),
                'menuitem'=>array('create','update','delete','arrange','advanced'),
                'util'=>array('flushcache','restoredefault','saveasdefault','reinstall','import','export'),
                'menuFields'=>array('menuid','visible','locked','sortposition','maxdepth','icon','titles','descriptions','scenarios','userroles','adminroles','createdinfo'),
                'menuitemFields'=>array('visible','active','labels','descriptions','url','target','ajaxOptions','linkOptions','ajaxOptions','itemOptions','submenuOptions','template','icon','scenarios','userroles','createdinfo'),
                'simulateFields'=>array('scenarios','userroles','languages'),
            ),
            array('deny'),
        );
    }
 )
Set menu, menuitem or util => false to hide this section/tab in the menubuilder form.
Example:
public function formPermissionRules()
    {
        return array(
            array('allow',
                'users' => array('admin'), //allow all to admin
            ),
            array('allow',
                  'users' => array('sitemaster'),

                    'menu'=>array('update','simulate','preview'), //no create, delete
                    'menuFields'=>array('visible','sortposition','maxdepth','icon','titles','descriptions','scenarios','userroles','createdinfo'), //no menuid, locked, adminroles
                    'menuitem'=>array('create','update','delete','arrange'), //no advanced
                    'util'=>false, // no import/export ...
                    //all menuItemFiels, simulate if not listed
                ),
            array('allow',
                  'users' => array('editor'), //allow only to arrange the menu items
                    'menu'=>false, //don't show the menu model properties, simulate and preview
                    'menuitem'=>array('arrange'), //no advanced
                    'util'=>false,
                ),
            array('deny'),
        );
    }
 )
Rendering the menus 
Run the EMBMenu widget in your layout view and set the attribute menuClass to a menu widget. The class must be a CMenu (no support for subitems), a CMenu descendant of your choice or one the integrated menus. Assign the options of the menu to the property menuOptions, as you would do it without the menubuilder. You can use the items property in the menuOptions too. These hardcoded items will be merged with the items from the menubuilder (see below).
The simplest usage
$this->widget('ext.menubuilder.widgets.EMBMenu', array(
              'menuClass'=>'ext.menubuilder.extensions.superfish.RSuperfish', //The integrated superfish menu
              //'menuOptions'=> array( ....), //the CMenu/Superfish properties
                'menuIds' => 'main', //display the menu with the id 'main'
               ));
This will render the RSuperFish menu the items of the menu with the id 'main'. If the user is a guest, all items with no userroles assigned or items with the userrole 'guest' will be visible. By assigning items in the menuOptions property, you can add fixed, hardcoded items as you would do in CMenu.
Merging menus
- Merge the menubuilder items with the hardcoded items like using the CMenu. Set the property menuBuilderItemsBefore=>false (default=true)
- Assign multiple menuIds as array ('main','main_frontend' ...)
- Assign one (as string) or more (as array) scenarios
Set the rootMenuIds property, if you want to merge the menu's with a single root label (the menu title or fixed) with the items from the menubuilder as subitems.
Example for a 'dashboard' view:
$this->widget('ext.menubuilder.widgets.EMBMenu', array(
              'menuClass'=>'ext.menubuilder.extensions.superfish.RSuperfish', //The integrated superfish menu
              'menuOptions'=> array( //fixed items
                    'items'=>array(
                        array('label'=>'Login', 'url'=>array('/site/login'), 'visible'=>Yii::app()->user->isGuest),
                        array('label'=>'Logout ('.Yii::app()->user->name.')', 'url'=>array('/site/logout'), 'visible'=>!Yii::app()->user->isGuest)
                    )
                ),
                'menuIds' => array('main','dashboard'),
               ));
The main menu will be visible at the frontend and the backend (if no userroles are assigned). Assign the userrole 'authenticated' to the 'dashboard' menu, so this items will only be visible if the user is logged in.
For more flexible, dynamic menus/items you should use 'scenarios' instead of the menuIds.
$this->widget('ext.menubuilder.widgets.EMBMenu', array(
              'menuClass'=>'ext.menubuilder.extensions.superfish.RSuperfish', //The integrated superfish menu
              //'menuOptions'=> array(...),
               'scenarios' => 'frontend', // array('frontend','backend','admin'),
               'rootMenuIds' => 'backend_admin', //array('backend_admin'=>array('label'=>'Adminmenu')),
               ));
This will display all menus and items configured with scenario 'frontend'. If a menu with the id 'backend_admin' has the scenario 'frontend' too, there will be added a label as root with the menutitle as text (or fixed to 'Adminmenu') and the menuitems as subitems of this label. Of course the visibility of the menus/items will be checked by userroles too.
Bootstrap navbar
You first have to get the items first and assign the result to the TbMenu.
$items=$this->createWidget('ext.menubuilder.widgets.EMBMenu', array(
                'menuIds'=>'navbar',
                'menuBuilderItemsBefore' => false,
                'menuOptions'=> array(
                    'items'=>array(
                        array('url'=>array('/menubuilder'),'label'=>'Menubuilder'),
                    )
                ),
               )
              )->getItems();


        $this->widget('bootstrap.widgets.TbNavbar', array(
            'collapse' => true,
            'items' => array(
                array(
                    'class' => 'bootstrap.widgets.TbMenu',
                    'encodeLabel'=>false,
                    'items' => $items,
                )
            )
        ));
Callbacks
For more complex menuitems you can register callback functions: onVisible, onActive, onLabel, onUrl. You can change visible, active, the label or the url before rendering the output.
If assigned, a evaluate expression will be executed on rendering the menu items. You can register an expression string or a function. The function will be called with the parameters: currentvalue (visible,active,label or url), model (the menuitem model), itemProvider (the itemProvider instance).
//Add a method to your controller like this, if the default activate handler of the CMenu doesn't work
public function checkMenuItemActive($active,$model,$itemProvider)
{
   //if(strpos($model->url, ...) && $this->action->id == ....)) ....
   return ($this->action->id == ....) ? true : false;
}


//in your view
$this->widget('ext.menubuilder.widgets.EMBMenu', array(
              'menuClass'=>'ext.menubuilder.extensions.superfish.RSuperfish',
              'onActive'=>array($this,'checkMenuItemActive'),
               ));
Advanced 
Customizing 
The menubuilder is designed to override the components and install the customized components. Example EMBDataFilter: This component - installed as default - implements methods to get the current user roles and the supported roles. If you have an authmanager installed, you can configure the EMBRbacDataFilter dataFilter in config/main.php instead.
'modules'=>array(

'menubuilder'=>array(
            ...
            'dataFilterClass'=>'EMBRbacDataFilter',

        ),
)
Example for a custom dataFilter: Create the file MyDataFilter.php in the components directory of the menubuilder module and configure MyDataFilter as dataFilterClass in config/main.php
class MyDataFilter extends EMBDataFilter
        {
            public static function getCurrentUserRoles()
            {
                switch(Yii::app()->user->id)
                {
                    case 'admin':
                    $roles = array('authenticated'=>'Authenticated user','admin'=>'Admin');
                    break;

                    case 'sitemaster':
                    $roles = array('authenticated'=>'Authenticated user','sitemaster'=>'Sitemaster');
                    break;
                    ...
                    default:
                    $roles = parent::getCurrentUserRoles(); //authenticated or guest or configured in config/main.php
                }

                return $roles;
            }

            public static function getSupportedUserRoles()
            {
                return array_merge(parent::getSupportedUserRoles(),array('admin'=>'Admin','sitemaster'=>'Sitemaster'));
            }
        }
)
Other installable classes: iconProviderClass, itemsProviderClass, dataAdapterClass, formPermissionsClass
Note: If you want to use a menu that is not a descencant from CMenu, you can override the EMBItemsProvider add a method 'getMyMenuItems' and install this class in the menubuilder. Override the EMBMenu with the getItems methods.
Output as list 
Use the EMBList widget to render menus/items as list (used in a portlet, linklist ...). Change the tags and tagHtmlOptions for your needs.
$this->widget('ext.menubuilder.widgets.EMBList', array(
        //'titleTag'=>'h4', //=default
        //'titleHtmlOptions'=>array(...),
        //'listTag'=>'ul', //=default
         //'itemTag'=>'li', //=default
         ...
        'menuIds'=>....
        'scenarios' => ...

    )
);
Ajax 
Fill the 'ajaxOptions' field in the advanced tab of the menuitem form with the update property: update=#ajaxContent This menu item will be rendered as an ajax call on click. The div with the specified id will be updated on success.
If you want to render all items of a menu as ajax items, you don't have to set the ajaxOptions for every item. You can use the property ajaxOptions of the EMBMenu widget instead. With the useAjaxOnClick attribute of the EMBMenu widget (default=false) you can decide, wether to add the ajax-call as the onclick-attribute of the item or bind it as jQuery event on document-ready.
Other menupreviews 
If you want to use another menu (example: XYMenu) in the preview:
- Register the menu in the menuconfig
'modules'=>array(

'menubuilder'=>array(
            ...
              'previewMenus'=>array(
                'xymenu'=>'My menu', //subdir => name

            )
        ),
);
- Create a viewfile '_xymenu.php' in the directory views/admin/menupreviews with the menu widget like _mbmenu.php or _superfish.php
Caching 
If your application has a cache installed, this one will be used to cache the menuitems. This will increase the performance of the menu output. Extra keys will be used for different menu configurations, depending on userroles, scenarios, ... In the menu adminMode, the cache will be flushed after every CRUD operation of a menu or menuitem. Set the modules property autoFlushCache to false if you don't want this behavior. With this configuration the admin user can modify the menus, the changes will be visible to online users after flushing the cache. You can flush the cache by executing the action flushCache in the utilities tab.
Important note: Flushing the cache will flush the applications global cache. To avoid this, you should use the cacheOptions property of the menubuilder. You can assign a different storage path for the menu cache (depending on cache type) to separate the menucache from the application cache.
Set the modules property cacheDuration to -1 to disable the cache.
An example configuration could be:
'modules'=>array(

'menubuilder'=>array(
            ...
            //'cacheDuration'=> 0, // =default: never expires
            'autoFlushCache' => false, //default: true
            'cacheOptions' => array(
                                    'cacheTableName' => 'menubuildercache', // for CDbCache
                                    //'cachePath' => 'pathToMenuBuilderCacheDir' //for CFileCache

                                   ),
        ),
)
You can set the EMBMenu/EMBList widgets attribute cached=>false if you want to exclude a specific menu from caching.
Utilities 
The util action links of the AdminController are available in the utilities tab of the menubuilder.
Use the import/export link in the utilities tab to transfer menus/items from you developer workstation to your production enviroment.
You can save a snapshot of the menus as default and restore this by restorefromdefault.
You can reinstall the menus too.
Note:
If you want to prepare a installation for your production enviroment, you can design the menu and save it as default. This will generate the files x_defaultmenuitems.php, x_defaultmenus.php (prefix x depends on the installed dataAdapter) in the data directory of the menubuilder. Rename these files to installmenus.php and installmenuitems.php and publish these files.
What's next 
The menubuilder includes the component EMBPageBehavior. You can't use this, it's unfinished and not tested.
If finished in the next release, you should be able to integrate the menubuilder with your cms. You can integrate a embedded form in your page model form, where the user can choose to create a menuitem before or after an existing item.
The menubuilder contains the german translation file messages/de/. I someone uses this extension in another language, please send me the translated messages.php.
Resources 
Integrated jQuery plugins / extensions
multipleselectbox jQuery plugin by Dreamltf for the icon dropDownList
- Yii extensions:
- ArrayModel (modified)
- EUserFlash
- ecollapse
- select2
- mbmenu
- superfish
Optional Yii extensions that must be installed manually
- YiiBooster for the 'bootstrap' theme
- mongoyii for the mongodb dataadapter
Changelog 
- v1.01 Bugfix:
- Path to select2 component 'ext.menubuilder.extensions.select2.ESelect2' instead of 'ext.select2.ESelect2' in the bluegrid-views
- data/mbmenus.php, data/mbmenuitems.php should not be included in the released code.
Very Good
Thank you so much , I need this extension very much .
Very impressive extension
I need to do something similar, and will download and study it. Thanks a lot for sharing!
Error
I have this error try access index.php/menubuilder with the basic configuration
"usort(): Array was modified by the user comparison function" in menubuilder/components/EMBFileAdapter.php
Any idea?
usort: php bug?
Google the error message:
for example here
Maybe this helps: modify usort to @usort in line 89 of the EMBFileAdapter.php
Or comment this line - but then the menus will not be sorted by sortposition/title.
Or maybe a simplier sort function (without the title as second criteria) works:
protected function sortMenus($a, $b)
    {
        if ($a->sortposition == $b->sortposition)
             return 0;
        else
            return ($a->sortposition < $b->sortposition) ? -1 : 1;
    }
Please let me know
Nice
Excellent, Thanks, you have github? you can add Yii::app()->clientScript->coreScriptPosition to registerScriptFile($assets.'/js/.js',Yii::app()->clientScript->coreScriptPosition)
demo
if there a demo page or screenshots, I think I did install it correctly but am no sure yet how to use it.
Yiistrap support
Is this extension going to be updated to support Yiistrap anytime soon. It fails for any boostrap setting in config using the new Yiistrap extensions.
bootstrap
Sorry, no Yiistrap support is planned yet.
In my projects I'm using yiibooster only.
But it should not be a lot of work:
Copy the modules/views/bootstrap folder to modules/views/yiistrap
Search for 'bootstrap' in the views:
Replace the bootstrap.widgets.X (TbButton, TbActiveForm,TbTabView,TbMenu...) with yiistrap components.
set the theme property of the menubuilder to 'yiistrap' in config/main.php
YiiBooster > 2.0.0 Fails
Hello. This is a great extension.
I have just experienced some errors when upgrading to newer version of YiiBooster.
Select2 won't select multiple items and some other things go wrong as well.
I hope that you have time to fix these issues because your extension is seriously nice.
Have a nice time.
select2
Detected this problem too a few days before:
I have tried to add yiistrap layout with yiiwheels select2.
The support for assoziative array data/tags for select2 went away :-(
I didn't found a solution, but the standard select2 - used in blueprint layout - works (delivered with the menubuilder).
So I will switch to this in bootstrap and yiistrap layout.
In the meanwhile - before the next release - you can do the same:
use the select2 code from blueprint layout and add bootstrap control divs ...
Thanks for the reply
Dear Joblo,
I have coded my way out of the problem, even I am a Yii noob. I'm sure that your product will be operational again and I think that it is kind of weird that they have removed some properties from the Select2 class and have introduced so many changes in the code that it is not recognizable anymore.
I believe that this is a defining moment in the future of all the Bootsrap related Yii packages. Maybe now we find out if we shoud keep to Wheel or Strap or Booster once and for all.
Have a nice day dear Joblo
Sincerely
Babak Bandpey
bootstrap
How did you solve the problem?
My idea is to add a method 'renderSelect2' to the EMBAdminController like below.
And use this in all layout views (blueprint, bootstrap, yiistrap ...)
public function renderSelect2($form,$label,$model,$attribute,$data)
    {
        echo CHtml::tag('span', array(), Yii::t('MenubuilderModule.messages', $label) . ' ');
        $this->widget('menubuilder.extensions.select2.ESelect2', array(
            'model' => $model,
            'attribute' => $attribute,
            'data' => $data,
            'options' => array(
                'width' => '250px',
            ),
            'htmlOptions' => array(
                'multiple' => 'multiple',
            ),
        ));

        echo $form->error($model, $attribute);
    }
Example usage in the views:
$this->renderSelect2($form,'Userroles',$model,'userroles',$viewParams['supportedUserRoles']);The bootstrap story never ends ... there exists another extension for bootstrap3 (4,5..).
Different problem
Dear Joblo,
My problem was about missing rangeFieldRow and that was why I upgraded to newer YiiBooster. But since the MenuBuilder began to malfunction, I reverted to the older YiiBooster and copied the needed functions from the new version into the older version and got the rangeFieldRow to work.
I Believe that your solution is excellent.
Looking forward to use the new version and setup.
Cheers.
Sincerely Babak
First impression
After reading (broadly) text and looking at screenshot, I thought, that this will be a great extension. And it is. It certainly is a good piece of code! However, I run into some issues after only five minutes of using it:
DB table prefix MUST be variable and user must be able to set it in application configuration. Forcing user to use
emb_prefix for DB tables, because it is currently hardcoded is very, very wrong and makes using your great extension in many Yii applications simply not possible. It isn't the good idea, that user takes your code and starts with rewritng it or at least changing hardcodedemb_DB's prefixes to something, that suits him or her.Yii application MUST be in English (must have
'language'=>'en_us') when installing / first running your menu, or else, menubuilder won't install default menu structure (currently it is available fordeanden_usonly). The other approach is to re-edit menu structure and fix it to current application's language. Nothing about this is anywhere in "Install" section of your extension's documentation or I did miss this.If there isn't any menu structure loaded (menu is completely empty), menubuilder does not display
titlefield (which is required) and thus makes itself completely unusable. User can't create first menu, becausetitlefield is required, which he or she can't fill-in, because it is hidden (not rendered) in the form.Menubuilder (your extension) is a module and thus, should be initially rendered in current user theme / layout, not introduce its own one. It isn't a good idea, that user takes your extensions's code and must start with rewriting views and controllers settings to make it displayed on app's default layout / theme.
You extensions uses
ESelect2extension and has all necessary code bundled with, but does not register it properly. So, first run of an application, after installing your extension, ends with critical Yii error, thatext.select2.ESelect2alias is invalid. To fix this, user must either installESelect2extension to/protected/extensions/folder or edit your extension's code and fix alias /ESelect2registration.Fixing above may take some time, so I must consider, if I have it or if I should go to something else, that will require less work to adapt it to a working application.
If you have any questions, please ask in the forum instead.
Signup or Login in order to comment.